
Rooting an Android device opens up a world of possibilities, allowing users to customize their widgets beyond the limitations imposed by manufacturers. One popular tool used for this purpose is Flashify APK. This step-by-step guide will walk you through using Flashify APK to root your Android device.

Step 1: Preparing Your Device
Before proceeding with rooting your device, it’s crucial to take some precautions:
- Backup Your Data: Rooting may result in data loss or even bricking your Phone. Therefore, backing up all critical files and data stored on your device is essential.
- Enable USB Debugging Mode: Go to Settings > About Phone> Tap “Build Number” seven times until Developer Options are enabled. Then go back and open Developer Options > enable USB Debugging mode.
- Ensure Sufficient Battery Level: Ensure your Phone has at least 50% battery charge before starting the rooting process.
- Install Flashify APK: Download and install the latest version of Flashify from a trusted source like XDA Developers or Google Play Store.
Step 2: Installing Custom Recovery
To begin flashing custom ROMs or any other modifications onto your rooted device, you need a custom recovery installed, such as TWRP (Team Win Recovery Project). Follow these steps:
- Connect Your Device via USB Cable: Connect your smartphone/tablet on Android OS with a PC/Laptop using a compatible USB cable.
- Open UpFlashify App: Launch the recently installed ‘Flashify’ app on our Android mobile/ tablet.
- Grant Superuser Access Permissions: When prompted by a Superuser access permissions request, a pop-up message appears; grant them without hesitation.
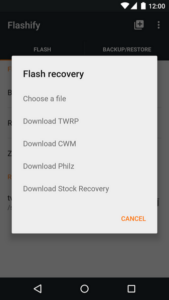
- Choose “Recovery Image”: Select the ‘Recovery image’ option within the flash menu. You can download the TWRP recovery image from the app or use an already downloaded file.
- Flash Recovery Image: Flashify will automatically flash your chosen custom recovery onto your device after selecting the appropriate option. Wait for the process to complete successfully.
Step 3: Backup and Restore
Once you have installed a custom recovery on your Android device using Flashify APK, it’s time to create a backup of your current system:
- Backup Your Current ROM: Relaunch Flashify and select ‘Backup’ from its main menu. This will completely back up your existing ROM and all stored data.
- Restore Backed Up Files (Optional): If anything goes wrong during future modifications or if you want to revert to stock firmware, simply open Flashify > tap ‘Restore’> select the previously created backup file.
Conclusion:
Rooting an Android device can be both exciting and daunting at first glance. However, by following this simple step-by-step guide utilizing Flashify APK for rooting purposes, users can safely unlock their devices’ potential without encountering significant issues. Always proceed cautiously when modifying any software, as there is always some risk involved.